Generating PDFs
Before you get into PDF generation, make sure you check out our getting started guide.
Anvil allows you to dynamically generate new PDFs using JSON data you provide via the /api/v1/generate-pdf REST endpoint. You can generate PDFs from your own HTML and CSS, or structured Markdown.
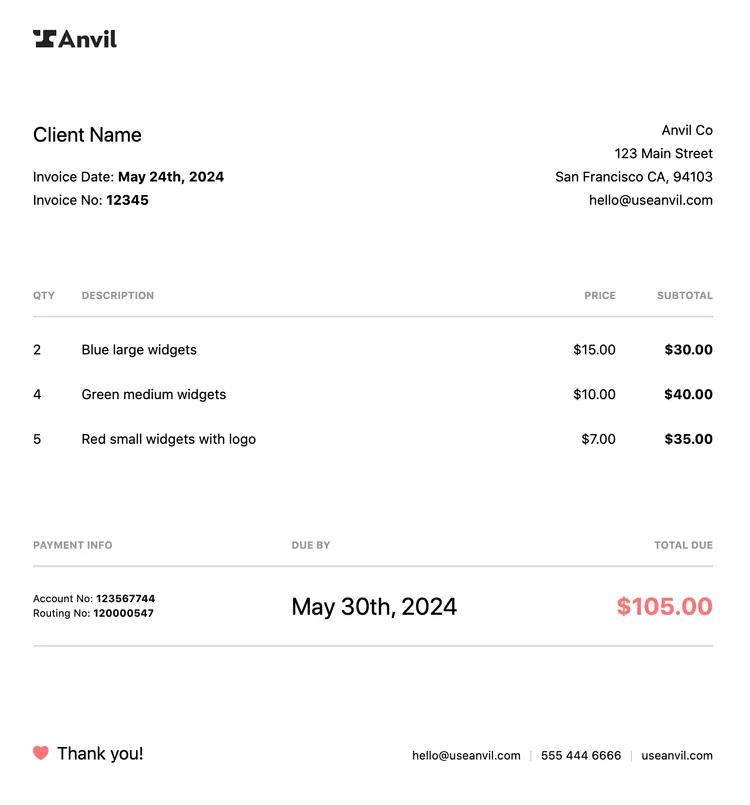
PDF generation is useful for agreements, invoices, disclosures, or any other text-heavy documents. Here's a generated invoice example:
Features
- Number of pages are dynamically generated to fit your content.
- Documents are generated with customizable page width, height, and margin, with 8.5" x 11" pages as the default.
- Convert your HTML and CSS into PDFs.
- Supports Markdown formatting, including tables, images, headings, etc.
- Supports custom fonts in both HTML to PDF and Markdown to PDF.
- Generate PDFs with all frontend technologies that output HTML and CSS including React and Vue.
Authentication
First you will need an API key. You can find your API key on the Organization Settings -> API Settings page (take me there). We provide language-specific API clients that wrap authentication and make using our API easier.
For more information on generating an API key and handling API authentication, check out the API getting started article.
Postman collection
Quickly see the PDF Filling endpoint in action with our PDF API Postman collection:

For more information on using the Postman workspace, see our Postman workspace guide.
HTML and React templates
We've created a couple HTML to PDF templates to get you up and running quickly. You can use these as a starting point for your own PDFs. Each of them has a plain HTML+CSS template and a React template.
Generating a PDF
POST to /api/v1/generate-pdf with the data you want to embed in the PDF. Anvil will respond with the raw binary data for the generated PDF.
There are two types of data accepted by our PDF generation API: HTML / CSS and Markdown. Both approaches are covered in the following sections.
POST https://app.useanvil.com/api/v1/generate-pdf
{
  // Optional - set the type of generation
  // Accepts `html` or `markdown` (default)
  "type": "markdown",

  // Optional - set the title encoded into the PDF document
  "title": "Example Invoice",

  // Required - the data to actually generate the PDF
  // `data` accepts either HTML/CSS or Markdown in a structured JSON format.
  // See the sections below for details.
  "data": ...

  // Optional - page settings
  // width - width of the page in a supported unit
  // height - height of the page in a supported unit
  // margin - margin between the page border and content in a supported unit
  // margin* - margin on a specific side
  // pageCount - display a page counter at location
  //             'topLeft', 'topCenter', 'topRight'
  //             'bottomLeft', 'bottomCenter', 'bottomRight'
  "page": {
    "width": "8.5in",
    "height": "11in",
    "margin": "50px",
    "marginTop": "30px",
    "marginBottom": "30px",
    "marginLeft": "60px",
    "marginRight": "60px",
    "pageCount": "bottomCenter",
  },

  // The following options are only used by `type: "markdown"` generation

  // Optional - set the font size, family, and text color
  // of the PDF (Markdown to PDF only)
  "fontSize": 16,
  "textColor": "#171717",
  "fontFamily": "Roboto",

  // Optional - show or hide the timestamp shown at the bottom of the PDF
  // defaults to true
  "includeTimestamp": true,

  // Optional - display a logo on the right corner of the first page
  "logo": {
    "src": "https://example.com/mtnlogo.png",
    "maxWidth": 200,
    "maxHeight": 200,
  },
}
// => binary PDF data
Supported CSS units for length values in page are: mm, cm, in, px, em, rem, pt, and pc.
The margin key supports CSS margin shorthand using only the supported units. The margin key has the lowest precedence, so any of marginTop, marginRight, marginBottom, or marginLeft will override the margin key for that specific property.
Saving the response as a PDF
The response from the PDF generation endpoint will be binary PDF bytes.
Make sure you save the response to PDF as binary data.
By default, many HTTP clients give you the HTTP response body as a text string. Additionally, many file handling libraries, even those built into your language of choice will default to encoding a file as UTF-8 on save. This can cause a corrupt file on disk even though the HTTP response was a valid PDF.
If you are seeing corrupt files:
- Check your request headers and verify your
Acceptheader is set toapplication/pdfor*/*. - Make sure you are receiving the HTTP response body from your HTTP client as binary (no encoding)
- When you save the file, ensure you save the the file as binary (also no encoding)
HTML & CSS to PDF
The PDF generation API will create the PDF with data in HTML & CSS format. All that's necessary is html and css string fields in the data object:
{
  "data": {
    "html": `
      <h1 class='header-one'>What is Lorem Ipsum?</h1>
      <p>
        Lorem Ipsum is simply dummy text of the printing and typesetting
        industry. Lorem Ipsum has been the industry's standard dummy text
        ever since the <strong>1500s</strong>, when an unknown printer took
        a galley of type and scrambled it to make a type specimen book.
      </p>
      <h3 class='header-two'>Where does it come from?</h3>
      <p>
        Contrary to popular belief, Lorem Ipsum is not simply random text.
        It has roots in a piece of classical Latin literature from
        <i>45 BC</i>, making it over <strong>2000</strong> years old.
      </p>
    `,
    "css": `
      body { font-size: 14px; color: #171717; }
      .header-one { text-decoration: underline; }
      .header-two { font-style: underline; }
    `,
  },

  // Page formatting options, etc.
  ...,
}
An example with curl:
curl \
  -X POST \
  -u YOUR_API_KEY: \
  -H 'Content-Type: application/json' \
  -d '{ "type": "html", "title": "World", "data": { "html": "<h1>HTML to PDF</h1>", "css": "h1 { color: purple; }" } }' \
  https://app.useanvil.com/api/v1/generate-pdf > test.pdf
Note: The logo, includeTimestamp, fontSize, fontFamily, and textColor payload properties are ignored when generating a PDF using HTML & CSS. Instead you can use HTML and CSS to style the document however you like :).
Supported format of data
data is an object consisting of the html and css properties.
{
  title: '...',
  data: {
    html: '<p>some html</p>',
    css: 'p { color: blue; }',
  },
}
html
Accepts HTML in string format.
{
  data: {
    html: "<h1 id='hello' class='title' style='color:grey;'>Hello World!</h1><p>Lots of paperwork</p>",
  },
}
css
Accepts CSS in string format.
{
  data: {
    css: "body { font-size: 14px; } #hello { color: #00ff77; } .title { font-weight: bold; } p { margin-bottom: 0px; }",
  },
}
Using custom fonts
By default, Anvil's HTML to PDF generator uses the Noto Sans font family. You can override the default font and load custom fonts by way of either the @import or @font-face CSS directives. These methods allow you to use webfonts from providers like Google Fonts, or self-hosted fonts.
Default font stack
It's important to first note the default font stack. You should include these fonts in your custom font stack. They will give you a fallback if your custom font doesn't support a glyph used in your HTML. For example, if you specify a font with only latin characters, then render Japanese hiragana in your HTML, the hiragana characters would not display unless the "Noto CJK" font was specified.
The defaults:
body {
  font-family: 'Noto Sans', 'Noto CJK', sans-serif;
}
Using @import
The @import directive is generally used with webfonts like Google Fonts. Here is an example using the Barlow font family:
@import url('https://fonts.googleapis.com/css?family=Barlow:ital,wght@0,400;0,700;1,400;1,700');

html body {
  /* We include the default font stack as a fallback */
  font-family: 'Barlow', 'Noto Sans', 'Noto CJK', sans-serif;
}
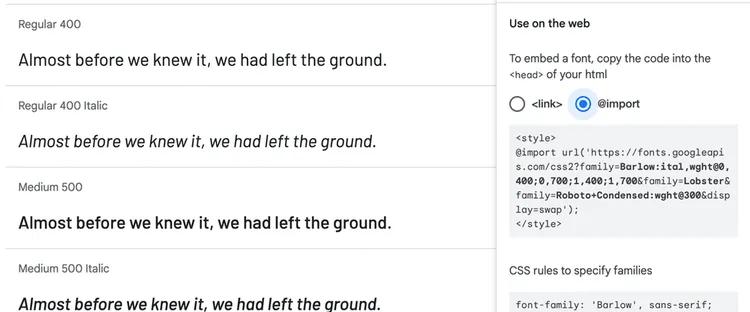
Most webfont providers offer a way to include the font via @import. For example, with Google Fonts, after you "select" a style, you can click on the @import option to get the import code. Note that with Google, you can omit the &display=swap parameter.
Using @font-face
Using @font-face gives you the flexibility to self-host fonts that are not covered by a webfont provider.
An example using @font-face:
@font-face {
  font-family: 'Pacifico';
  src: url('https://example.com/fonts/PacificoNormal.ttf');
  font-weight: normal;
  font-style: normal;
}
@font-face {
  font-family: 'Pacifico';
  src: url('https://example.com/fonts/PacificoBold.ttf');
  font-weight: bold;
  font-style: normal;
}

html body {
  /* We include the default font stack as a fallback */
  font-family: 'Pacifico', 'Noto Sans', 'Noto CJK', sans-serif;
}
Note: at this time we only support fonts in the TTF file format. Font file HTTP responses must set the Content-Type response header to either font/ttf or application/x-font-ttf. All other font formats and content types will be ignored.
Advanced HTML & CSS features
There are a few additions to HTML & CSS to help rendering in the PDF context. Generally, the features covered here will help you control page-level rendering on a PDF. HTML and CSS don't have the concept of a page in the same way a PDF does, so there are no mechanisms built into vanilla HTML / CSS to help with page-level rendering. Our HTML renderer has a few extensions that make working with pages a lot easier.
A couple of HTML to PDF resources:
- See the advanced HTML & CSS features blog post for more of a tutorial experience.
- Check out our invoice template example repo. The template uses all the features covered in this guide, and is a great starting point for your own PDF.
This guide will cover
- Repeating table headers on each page
- Forcing page breaks
- Rendering page numbers
- Rendering HTML elements in the page margins
- Rendering a PDF with React, Vue, or the renderer of your choice
Repeating table headers
When a table overflows onto a new page, you can have the headers and footers repeat on the new page. For example:
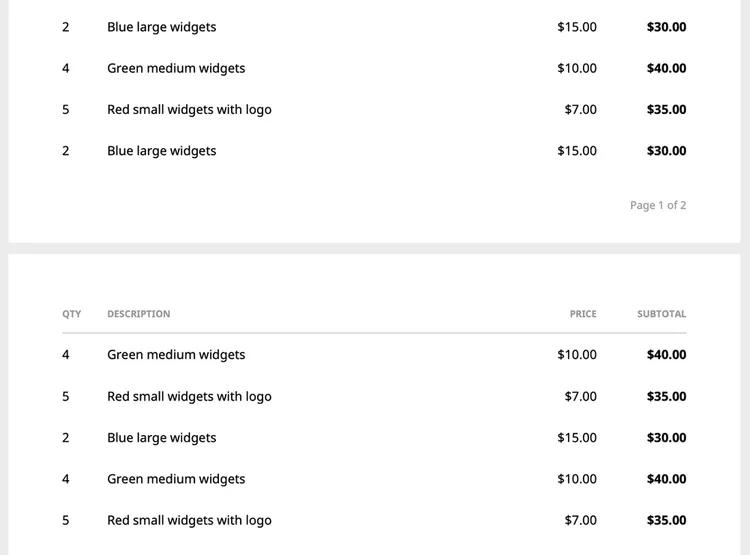
Table header repeating is supported and turned on by default. All you have to do is make sure you put your header th in a thead element. If you'd like to repeat the footer, make sure your footer content is in a tfoot element:
<table>
  <thead>
    <tr>
      <th>Qty</th>
      <!-- ... -->
    </tr>
  </thead>
  <tbody>
    <tr>
      <td>2</td>
      <!-- ... -->
    </tr>
    <!-- ...Many more rows... -->
  </tbody>
  <tfoot>
    <tr>
      <!-- Footer Content here -->
    </tr>
  </tfoot>
</table>
Turning header repeating off
While table header repeating is on by default, you can turn it off with a custom CSS rule -fs-table-paginate:
table.no-header-repeat {
  -fs-table-paginate: none;
}
Or you can disable it by simply not using thead, tbody, and tfoot elements.
Forcing page breaks
You can force page breaks with the page-break-before: always rule on any element. It will create a new page, then set the element with the page-break-before CSS rule as the first element of that page.
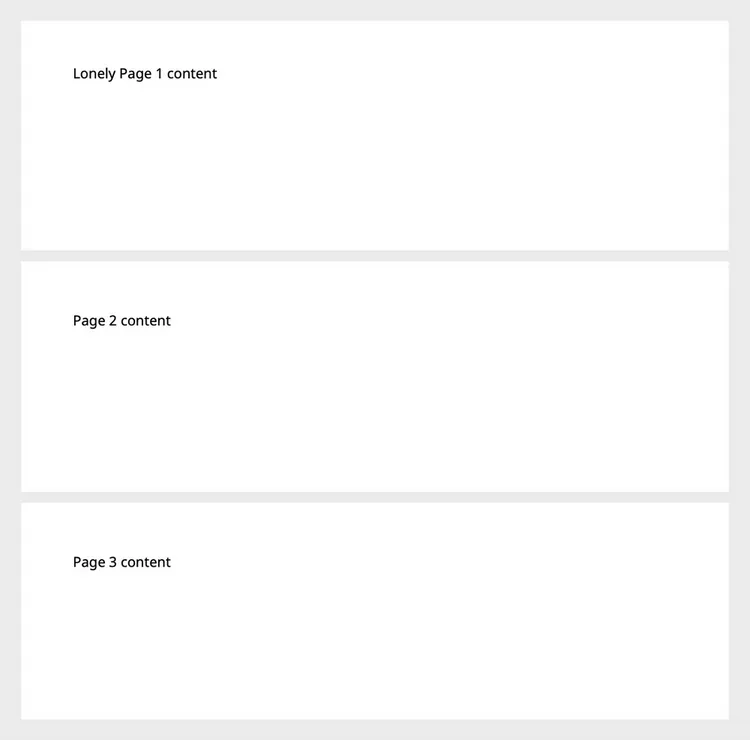
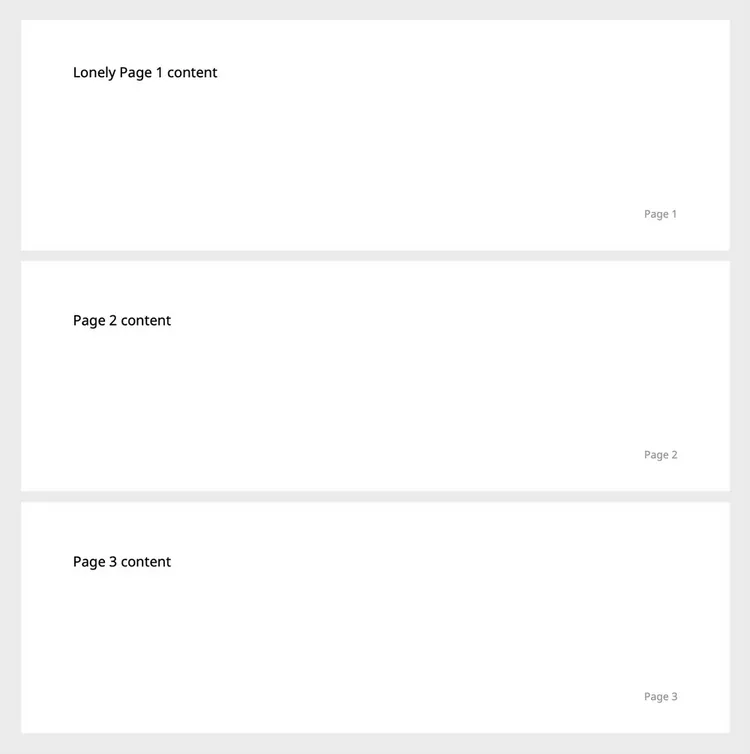
Here's a simple example with three pages:
<!-- Page 1-->
<div>Lonely Page 1 content</div>

<!-- .new-page causes a page break -->
<div class="new-page">Page 2 content</div>

<!-- .new-page causes another page break -->
<div class="new-page">Page 3 content</div>
CSS:
.new-page {
  page-break-before: always;
}
Output:
Rendering page numbers
You can inject page numbers and total pages into any element by using a bit of special CSS. You target the content of your chosen element's ::after pseudo-element with a special directive:
<div class="page-container">
  Page
  <span class="page"></span>
  of
  <span class="pages"></span>
</div>
And the CSS
.page-container .page::after {
  content: counter(page);
}

.page-container .pages::after {
  content: counter(pages);
}
The targeted elements can be on any page you'd like. But it's likely most important to render the page number information on each page, in one of the margins.
Rendering in the page margins
The HTML renderer allows rendering anything you'd like in the margins by way of a "running" element.
You render an element in the body like any other element, define the element as a "running" element, then tell each page to use that element in one of the defined margin areas.
Here's an example that uses the page number example above and renders it in the bottom right margin on every page.
<body>
  <!--
    We'll make this a "running" element in the css.
    This element should be the first element after the body
    to show on all pages.
  -->
  <div class="page-container">Page <span class="page"></span></div>

  <!-- other elements -->
  <div>...content...</div>
</body>
CSS:
.page-container {
  /* Define this element as a running element called "pageContainer" */
  position: running(pageContainer);
}

@page {
  /*
  Use any of these locations to place your margin elements:
  @top-left, @top-left-corner
  @top-center
  @top-right, @top-right-corner
  @bottom-left, @bottom-left-corner
  @bottom-center
  @bottom-right, @bottom-right-corner
  */
  @bottom-right {
    /*
    Reference "pageContainer" to be the content for the
    bottom right page margin area
    */
    content: element(pageContainer);
  }
}
The output using the page breaks and applying a little styling to the page numbers:
Pseudo page matchers
You can control what page the rendered content is on using psuedo page matchers, which are syntactically the same as CSS pseudo selectors. The valid page matchers are:
:first- The rendered content will only be on the first page.:right- The rendered content will only be on the "right" pages. By convention, this starts with the first page. It will render the content on the first, third, fifth, etc. pages.:left- The rendered content will only be on the "left" pages. By convention, this starts with the second page. It will render the content on the second, fourth, sixth, etc. pages.
<body>
  <div class="logo">Logo</div>

  <!-- other elements -->
  <div>...content...</div>
</body>
CSS:
.logo {
  position: running(logo);
}

@page:first {
  @top-right-corner {
    content: element(logo);
  }
}
The above example will render "Logo" in the top right corner of the first page, and only the first page. You can use this pseudo page matcher if you want to generate PDFs with your logo only on the first page.
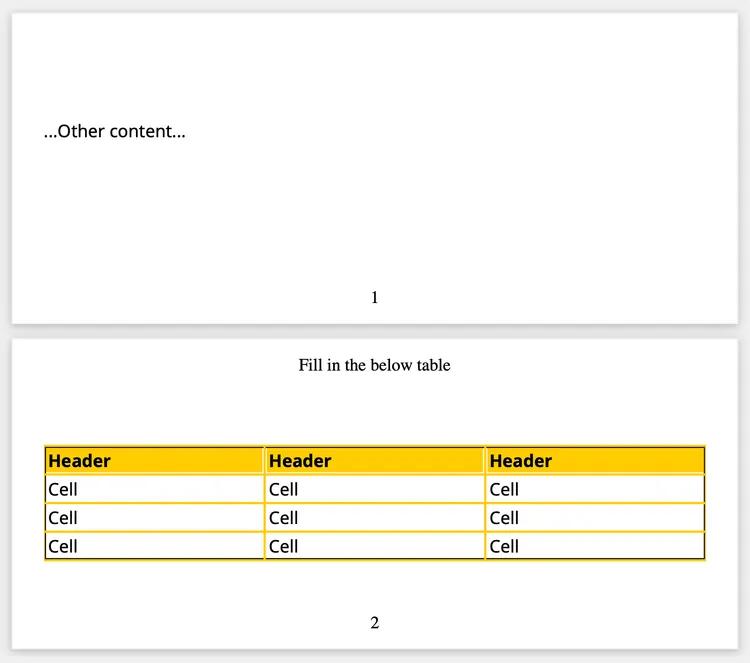
Named pages
If you want to specify a page to render in the margins other than the first page, you will want to use a named page. If you want to target the first page, use the :first pseudo page matcher.
You can named page using the custom page property and use any string you'd like as the name. Then you can reference that named page in the @page rule.
<body>
  <div class="a-page">
    <div>...Other content...</div>
  </div>
  <div id="table-page" class="a-page">
    <table>
      <thead>
        <tr>
          <th></th>
          <th>Header</th>
          <th>Header</th>
        </tr>
      </thead>
      <tbody>
        <tr>
          <td>Cell</td>
          <td>Cell</td>
          <td>Cell</td>
        </tr>
        <tr>
          <td>Cell</td>
          <td>Cell</td>
          <td>Cell</td>
        </tr>
        <tr>
          <td>Cell</td>
          <td>Cell</td>
          <td>Cell</td>
        </tr>
      </tbody>
    </table>
  </div>
</body>
CSS:
#table-page {
  page: tablePage;
}

@page tablePage {
  @top-center {
    content: 'Fill in the below table';
  }
}

.a-page {
  margin-top: 50px;
}

table {
  margin-top: 100px;
  width: 100%;
  background-color: #ffffff;
  border-collapse: collapse;
  border-width: 2px;
  border-color: #ffcc00;
  border-style: solid;
  color: #000000;
}

table td,
table th {
  border-width: 2px;
  border-color: #ffcc00;
  border-style: solid;
  padding: 3px;
}

table thead {
  background-color: #ffcc00;
}
We recommend targeting a named page with an id selector. Since naming pages is targeting a specific page, the page HTML should use a unique id.
Here's the output. Notice the 'Fill in the below table' only on the second page, which is named 'tablePage':
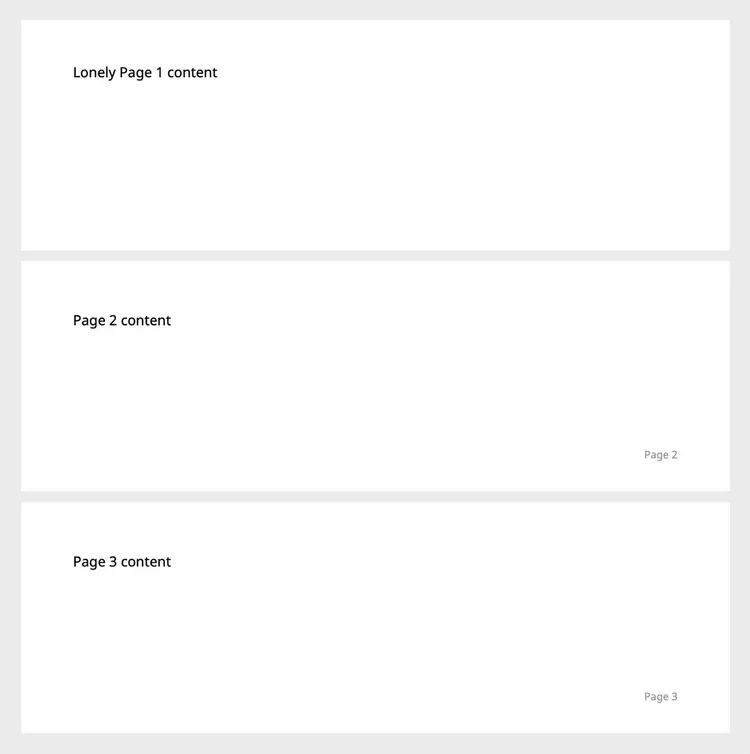
Element location
A "running" element's location in the HTML determines which pages it shows on. If you want it in a margin element on all pages, just make sure to place the "running" element before all non-running HTML elements in the HTML code. For example, place all your margin elements that show on all pages right after the <body> element.
To see this behavior in action, using the page number and page break examples above, we can start the page numbering on the 2nd page by placing the running pageContainer element on the second page.
<div>Lonely Page 1 content</div>
<div class="new-page">Page 2 content</div>

<!--
  The page numbering will start on the 2nd page because
  we're rendering it after page 2's pagebreak
-->
<div class="page-container">Page <span class="page"></span></div>

<!-- Page 3 will also have the page number in the margin -->
<div class="new-page">Page 3 content</div>
CSS:
.page-container {
  /* Define the this element as a running element called "pageContainer" */
  position: running(pageContainer);
}

.new-page {
  page-break-before: always;
}

@page {
  @bottom-right {
    /* Reference "pageContainer" to be the content for the bottom right page margin area */
    content: element(pageContainer);
  }
}
Here's the output. Notice there is no Page 1 on the first page:
Positioning margin elements
Margin elements may not render exactly where you want them to. It's possible to place them exactly where you want with margin-top.
<div class="margin-content">Margin Content</div>
CSS:
.margin-content {
  position: running(marginContent);

  /* Position the element with margins */
  margin-top: 10px;

  /* Style margin element like any other */
  font-size: 12px;
  color: #c00;
}

@page {
  @top-left {
    content: element(marginContent);
  }
}
margin-top: 0:

margin-top: -25px:

margin-top: 25px:

Rendering fillable forms
You can render HTML forms to create fillable PDFs. All inputs must be within a <form/> element, must have a valid type attribute, and must have a valid name attribute.
<form>
  <input type="text" name="myInput" value="default" />
  <input type="text" name="myOtherInput" />

  <textarea type="text" name="myTextArea">Goodbye Cruel World!</textarea>

  <input type="radio" name="myRadioGroup" value="One" />
  <input type="radio" name="myRadioGroup" value="Two" />
</form>
Rendering with React, Vue, etc.
The generate-pdf endpoint only ingests vanilla HTML & CSS. But it is possible to use any renderer or preprocessor that outputs a string HTML or CSS. So, you can use React, Vue, Ember, Handlebars, styled-components, LESS, SASS, SCSS, or your own custom renderer.
See the Using React and styled-components to generate PDFs blog post for a tutorial using React and styled-components. We also have a Vue-specific blog post on generating PDFs. Note that this approach can be extended to any technologies you'd like to use.
Here's a quick Node example using React and styled-components to generate the HTML & CSS payload.
import React from 'react'
import ReactDOMServer from 'react-dom/server'
import styled, { ServerStyleSheet } from 'styled-components'

const Package = styled.span`
  color: magenta;
`

const Hello = () => (
  <div>
    Hello from <Package>React</Package> & <Package>styled-components</Package>!
  </div>
)

function buildHTMLToPDFPayload() {
  const sheet = new ServerStyleSheet()
  const html = ReactDOMServer.renderToStaticMarkup(
    sheet.collectStyles(<Hello />)
  )
  const css = sheet.instance.toString()
  return {
    data: {
      html,
      css,
    },
  }
}
HTML to PDF Limitations
- CSS Flexbox and Grid are currently not supported.
- Custom fonts must be in the
TTFfile format.
Markdown to PDF
The PDF generation API will create the PDF with an array of objects, each supporting Markdown.
{
  ...,
  "fontFamily": "Barlow",
  "data": [
    {
      "label": "Name",
      "content": "Sally Smith",
    },
    {
      "content": "Lorem **ipsum** dolor sit _amet_...",
      "fontSize": 12,
      "textColor": "#616161",
    },
    {
      "table": {
        "rows": [
          ["Description", "Quantity", "Price"],
          ["4x Large Wigets", "4", "$40.00"],
          ["10x Medium Sized Widgets in dark blue", "10", "$100.00"],
          ["6x Small Widgets in white", "6", "$60.00"],
        ],
        "columnOptions": [
          { "align": "left", "width": "60%" },
          { "align": "center", "width": "100px" },
          { "align": "right" },
        ],
        "firstRowHeaders": true,
        "rowGridlines": true,
        "columnGridlines": true,
        "verticalAlign": "center"
      }
    }
  ]
}
An example with curl:
curl \
  -X POST \
  -u YOUR_API_KEY: \
  -H 'Content-Type: application/json' \
  -d '{ "title": "Hello", "data": [ { "label": "Hello World", "content": "I like turtles" } ] }' \
  https://app.useanvil.com/api/v1/generate-pdf > test.pdf
Supported format of data
data is specified as an array of objects. The objects have a handful of supported keys. Objects can contain multiple keys.
{
  title: '...',
  data: [
    {
      label: 'A label',
      content: 'Some content',
      fontSize: 12,
      textColor: '#171717',
    },
    // ... more data to output
  ]
}
label
Generates a bolded label
{
  data: [
    {
      label: 'A label',
    },
  ]
}
heading
Generates a larger bolded heading intended to break up sections of a document.
{
  data: [
    {
      heading: 'Some Heading',
    },
  ]
}
content
Generates a block of text. Supports multiline text and markdown formatting, including headings, bold, italic, bullets, tables, blockquotes, links, images, etc.
{
  data: [
    {
      content:
        'Some content\n\nAnother line of content with [a link](https://google.com)',
    },
  ]
}
table
While the content key supports markdown tables, they can be difficult to generate, so we provide a specific table key.
{
  data: [
    {
      table: {
        // (required) The data!
        rows: [
          ['Description', 'Quantity', 'Price'][('A widget', '3', '$3')][
            ('Some other widget', '10', '$10')
          ],
        ],

        // (optional) firstRowHeaders defaults to true
        // set to false for no header row on the table
        firstRowHeaders: true,

        // (optional) rowGridlines / columnGridlines defaults to false
        // set to true to display gridlines in-between rows or columns
        rowGridlines: true,
        columnGridlines: false,

        // (optional) verticalAlign defaults to 'top'
        // adjust vertical alignment of table text
        // accepts 'top', 'center', or 'bottom'
        verticalAlign: 'center',

        // (optional) columnOptions - An array of columnOption objects.
        // You do not need to specify all columns. Accepts an
        // empty object indicating no overrides on the
        // specified column.
        //
        // Supported keys for columnOption:
        // align (optional) - adjust horizontal alginment of table text
        //         accepts 'left', 'center', or 'right'; defaults to 'left'
        // width (optional) - adjust the width of the column
        //         accepts width in pixels or as percentage of the table width
        columnOptions: [
          { align: 'left' }, // the default
          { align: 'center', width: '100px' },
          { align: 'right', width: '20%' },
        ],
      },
    },
  ]
}
fontFamily
Will apply a custom font to the specified section of the PDF:
{
  data: [
    {
      content: 'Lorem ipsum',
      fontFamily: 'Roboto Mono', // Use the Roboto Mono google font
    },
  ]
}
See the Custom fonts with fontFamily section below for more info.
fontSize / textColor
Applies the specified font size or text color to that section of the PDF.
{
  data: [
    {
      content: 'Lorem ipsum',
      fontSize: 20, // must be an int within 5 to 30
      textColor: '#006ec2', // must be a 6 digit hex code
    },
  ]
}
Custom fonts with fontFamily
By default, the markdown to PDF generator uses the Noto Sans font family. This is configurable at the document level, and for each individual field. Here is an example using multiple fonts.
{
  fontFamily: 'Lato',
  data: [
    {
      // Uses the fontFamily specified at the root
      content: 'Content in Lato',
    },
    {
      // Use the Roboto Mono font for only this piece of content
      fontFamily: 'Roboto Mono',
      content: 'I am Mr. Roboto',
    },
  ]
}
Supported fonts
The markdown to PDF generator currently supports the following fonts:
- Default:
Noto Sansand various Noto fonts to handle CJK. - Builtin fonts:
Courier,Helvetica,Times New Roman. - All Google fonts are supported. Specify the name exactly as the Google fonts website indicates.
Note that font names are case-sensitive and must be exact, i.e. 'Barlow', not 'barlow'. You will receive an error if your specified font is not found, or if the font name is incorrect.
If the font you specify does not contain a glyph used in your content, the Noto Sans and Noto CJK fonts will be used as fallbacks.
Specifying a custom logo
By default, the Anvil logo will be displayed on the right corner of the first page.
To remove the logo, set the logo property to false.
You can also set your own logo:

{
  logo: {
    // (required) Supports http(s) and data URIs
    src: 'https://example.com/mtnlogo.png'

    // (optional) The max size to display the logo
    // * Default is 200px
    // * Maximum is 500px
    maxWidth: 200,
    maxHeight: 200,
  },
  title: 'Logo Example',
  data: [{
    content: 'Hello _World_!'
  }]
}
Using images
Most PDFs our customers generate contain one or more images. Images used in HTML or markdown generation must be publicly accessible. Our system cannot login to your system. This may sound scary if you are referencing images with sensitive data in them, but there is a secure solution: signed URLs.
All major cloud providers have support for signed URLs. With a signed URL, you can send Anvil a URL to an image in your storage bucket with an expiring token. See the docs for your specific cloud provider:
See the performance section below for image performance tips. If you are having trouble with images, see the troubleshooting section.
Performance
PDF generation performance can vary with the HTML & CSS or Markdown input sent to the generation endpoint.
By far the greatest impact on performance is images in your HTML code or markdown payload. If you are experiencing slow HTML to PDF generation, it is extremely likely there are images referenced in your code that are slow to download. For example, if your HTML renders an image that takes one second to download, the generation cannot be any shorter than one second.
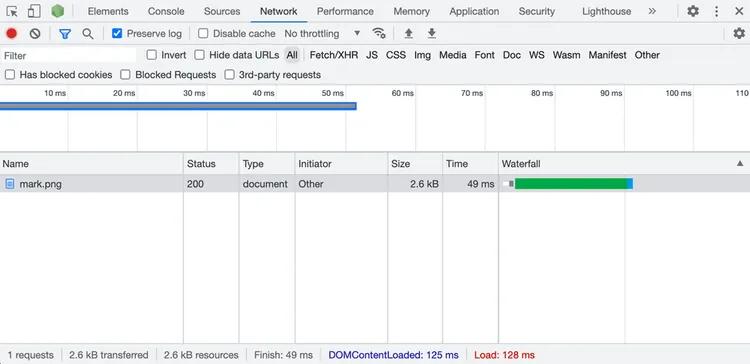
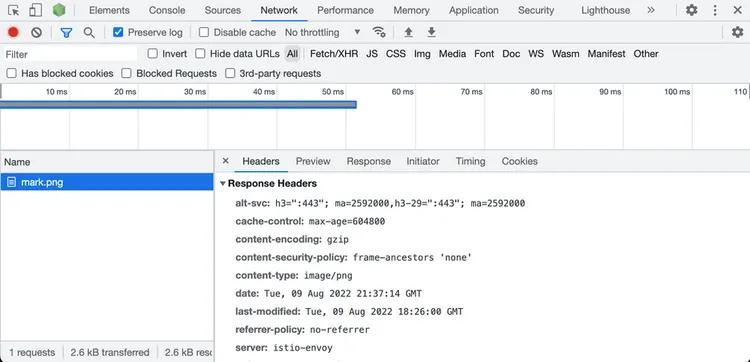
It is useful to test your images in a browser. All modern browsers have developer tools with a network panel. Open the network panel and paste your image's URL into the browser's address bar. The network panel will show you how long your image takes to load, its content-type, size, etc.
It is fastest to load your images from a CDN or a cloud storage bucket with signed URLs. Beyond that, here are a few image performance guidelines:
- Ideally your images will download in a browser environment in tens of milliseconds. If your images take longer, they likely can be optimized.
- Make sure your image URLs do not make any redirects. Referencing images from services like Google Docs, Google Drive, Dropbox, etc. may make redirects which can take over a second. You can see the redirects in your network panel when you load these URLs in a browser.
- Make sure your images are as small as possible. For png images, you can use pngcrush. Generally resizing or compressing images so they are max 2x the size they will be displayed can lead to significant reductions in size.
- Make sure your images correctly set the
Content-Typeresponse header. - For very small images, you can use data URIs so there is nothing to download!
- Make sure you don't have any broken images / URLs that do not load.
Here is an example of a well-behaved image: 50ms load time, less than 5kb in size, no redirects, and it has the Content-Type properly specified:
Using the API clients
For convenience, we provide language-specific API clients that help with authentication and PDF generation. They handle authentication, PDF generation, and errors to help with debugging. See the API usage examples for an example in your favorite language. Below is an example using the node API client.
import fs from 'fs'
import Anvil from '@anvilco/anvil'

const apiKey = '7j2JuUWmN4fGjBxsCltWaybHOEy3UEtt'

const exampleData = {
  title: 'My PDF Title',
  data: [
    {
      label: 'Hello World!',
    },
  ],
}
const anvilClient = new Anvil({ apiKey })
const { statusCode, data } = await anvilClient.generatePDF(exampleData)

console.log(statusCode) // => 200

// Data will be the generated binary PDF data
fs.writeFileSync('output.pdf', data, { encoding: null })
Encrypting Data Payloads
You can encrypt the data sent in to generate the PDF. Setup an RSA keypair, then encrypt the string value of the data property with your public key. You can use our node encryption library.
POST https://app.useanvil.com/api/v1/generate-pdf
{
  // Encrypt with your RSA key
  "data": 'an encrypted JSON string'

  // Other metadata
  "title": "Some Title",
}
// => binary PDF bytes
Handling Errors
Should you run into any errors, the response status will be >= 400, and the body will be a JSON payload.
POST https://app.useanvil.com/api/v1/generate-pdf
{
  // empty request body!
}
// => 400
{
  "name":"ValidationError",
  "fields":[{
    "message":"Required",
    "property":"data"
  }]
}
Request size limit
At this time, an application/json POST request body is limited to a maximum size of 1 megabyte (1,048,576 bytes). Exceeding the limit will result in a 413 - Request Too Large error. When rendering images, it is good practice to send them in as URLs.
If you need to send a larger payload, you can use a multipart/form-data POST request. All top level fields attributes (title, data, etc.) should be specified as a separate request part within the request.
Rate Limits
See the rate limits section of our getting started guide for full details.
Troubleshooting
Sometimes things go wrong! That's ok, here are some common problems and steps to resolve them. If after reading this, you are still having issues, please contact support, and we can help sort it out.
The saved PDF file is corrupt / invalid
This is often an encoding issue. PDF is a binary format, and the PDF generation endpoint's response body will be binary PDF bytes.
- Make sure you are receiving the HTTP response body as binary (no encoding) from your HTTP client
- When you save the file, ensure the file is saved as binary (also no encoding)
See saving the response as a PDF for full details.
How do I remove the watermark from the generated PDF?
Please make sure you are using your production API key. All calls to the generation endpoint with a development API key will contain the Anvil watermark.
It is slow to generate the PDF
Slow PDF generations are usually due to image loading; often with payloads that have slow-to-download images, have broken images (404), or have images with redirects. See the performance section for more info on how you can improve your image URLs.
My images are not showing in the generated PDF
Images not rendering could be due to a couple things:
- Images must be publicly accessible. Make sure your images can be loaded in an incognito browser window. See the using images section for more info.
- Our image loader has a short timeout. Make sure your images load in less than two seconds, ideally in less than one second.
- Make sure your image link is not broken! This seems obvious, but broken images are more common than you'd expect.
- If your image is >= 10 megabytes in size, the system may not load your image.
- Some obscure SVG features are not supported. If your SVG is not displaying and you are sure it loads quickly in a browser, convert it to a raster image format (png, jpg, etc.). You can email us SVGs that do not render at support@useanvil.com.
- SVG images require the
xmlns="http://www.w3.org/2000/svg"attribute to be set.
My @font-face fonts are not in the generated PDF
- Make sure the font files are publicly accessible.
- Make sure font files are in the
TTFfile format. - Check the
Content-TypeHTTP response header on your font files.Content-Typemust be set to eitherfont/ttforapplication/x-font-ttf. - Make sure your font supports the glyphs you are trying to render.
Resources
Here are a few resources that may help getting going with PDF generation:
- PDF generation postman collection
- Language-specific API clients - wrap authentication and have a
generatePDFfunction - Advanced HTML & CSS features blog post
- Using React and styled-components to generate PDFs blog post
- Invoice HTML & CSS template example repo. The template uses all the features covered in this guide, and is a great starting point for your own PDF.