The dreaded loading spinner
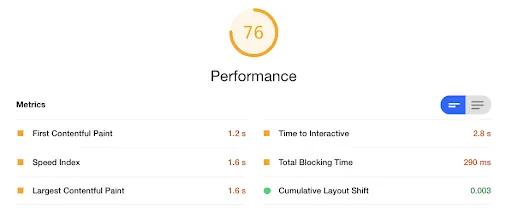
The two key metrics in determining whether users will stay on your site is the time it takes to load the page and the time it takes to interact with it. The first is First Contentful Paint and the second is Time to Interactive. You can find these metrics for your own site by going to your developer tools and generating a report under the Lighthouse tab on Chrome.
 Lighthouse metrics for a random web app
By minimizing the size of the bundle, we reduce the time it takes for browsers to download the JavaScript for our site, improving user experience. With every additional second of wait time, the user is more likely to close the tab. Consider all of the users that visit your site everyday and that can be thousands of seconds wasted. The chance of losing a potential user is even higher when you have a complex web app, making it even more important to ensure the bundle size stays low.
Understanding the situation
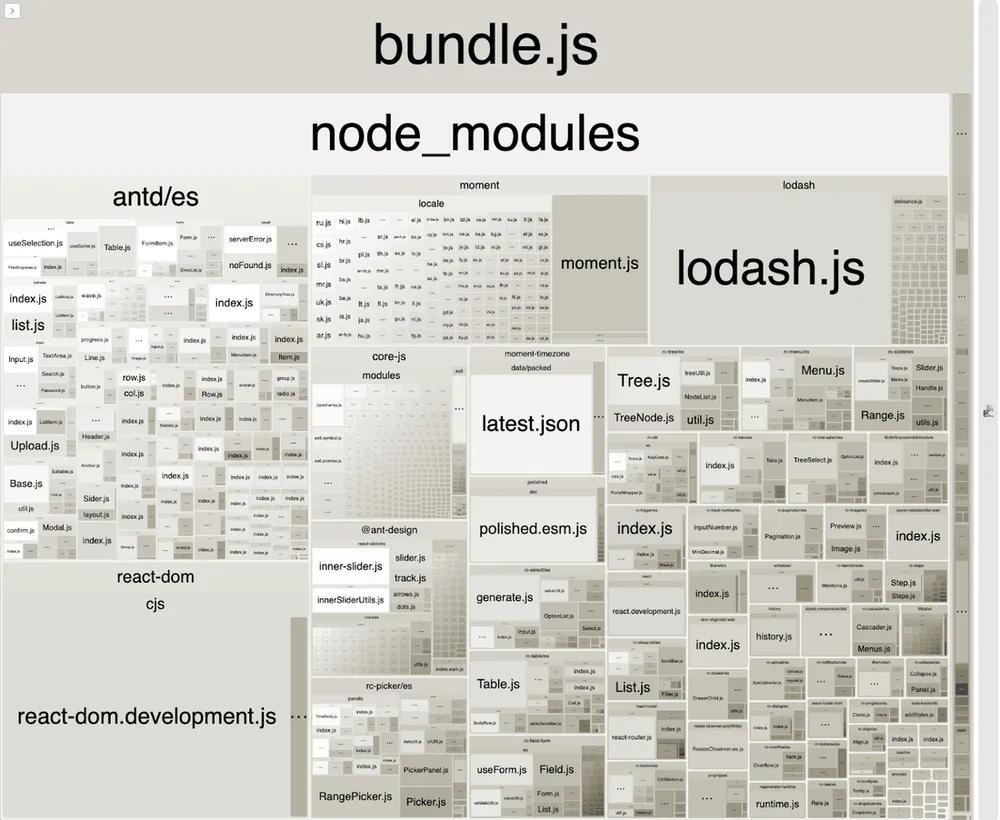
Let’s start by getting an understanding of all the code & dependencies that need to be sent to the browser, along with the memory size of each. Adding webpack-bundle-analyzer to your webpack configuration is the perfect starting point.
Install:
yarn add -D webpack-bundle-analyzer
# or
npm install --save-dev webpack-bundle-analyzer
Usage:
import WebpackBundleAnalyzer from 'webpack-bundle-analyzer'
webpackConfig.plugins = [new WebpackBundleAnalyzer.BundleAnalyzerPlugin()]
After compiling your bundle, your browser should open up a visualization of all the content and its memory sizes:
 Visualization of the bundle
Tree shaking
Webpack works by building a dependency graph of every module imported into our web app, traversing through files containing the code we need, and bundling them together into a single file. As our app grows in complexity with more routes, components, and dependencies, so does our bundle. When our bundle size exceeds several MBs, performance issues will arise. It’s time to consider tree shaking as a solution.
Tree shaking is a practice of eliminating dead code, or code that we’ve imported but do not utilize. Dead code can vary from React components, helper functions, duplicate code, or svg files. Let's go through ways of reducing the amount of dead code we have with help from some Webpack plugins.
babel-plugin-import
The babel-plugin-import plugin for babel-loader enables Webpack to only include the code we need when traversing through dependencies during compilation, instead of including the entire module. This is especially useful for heavy packages like antd and lodash. More often than not, web apps only need select UI components and helper functions, so let’s just import what’s needed.
Install:
yarn add -D babel-plugin-import
# or
npm install --save-dev babel-plugin-import
Usage:
webpackConfig.module.rules = [
  {
    test: /\.(js|jsx)$/,
    include: [path.resolve(__dirname, 'src', 'client')],
    use: [
      {
        loader: 'babel-loader',
        options: {
          plugins: [
            // modularly import the JS and styles that we use from ‘antd’
            ['import', { libraryName: 'antd', style: true }, 'antd'],
            // modularly import the JS that we use from ‘@ant-design/icons’
            [
              'import',
              {
                libraryName: '@ant-design/icons',
                libraryDirectory: 'es/icons',
              },
              'antd-icons',
            ],
          ],
        },
      },
    ],
  },
]
We instantiated two instances of babel-plugin-import, one for the antd package and the other for the @ant-design package. Whenever Webpack encounters import statements from those packages, it is now selective in terms of what part of the package to include in the bundle.
import { Dropdown } from 'antd'
// transforms to
var _dropdown = require('antd/lib/dropdown')
babel-plugin-lodash
Similar to babel-plugin-import, the babel-plugin-lodash plugin cherry picks the code we need to import from lodash. The parsed size of the entire lodash package is ~600KB, so we definitely don’t want everything.
Install:
yarn add -D babel-plugin-lodash
# or
npm install --save-dev babel-plugin-lodash
Usage:
webpackConfig.module.rules = [
  {
    test: /\.(js|jsx)$/,
    include: [path.resolve(__dirname, 'src', 'client')],
    use: [{
      loader: 'babel-loader',
      options: {
        plugins: [
          ...,
          // modularly import the JS that we use from ‘lodash’
          'lodash',
        ],
        presets: [
          ['@babel/env', { targets: { node: 6 } }],
        ],
      },
    }],
  },
]
If you’re already using babel-plugin-import for lodash, this may be unnecessary, but it’s always nice to have alternatives.
import _ from 'lodash'
const objSize = _.size({ a: 1, b: 2, c: 3 })
// transforms to
import _size from 'lodash/size'
const objSize = _size({ a: 1, b: 2, c: 3 })
context-replacement-plugin
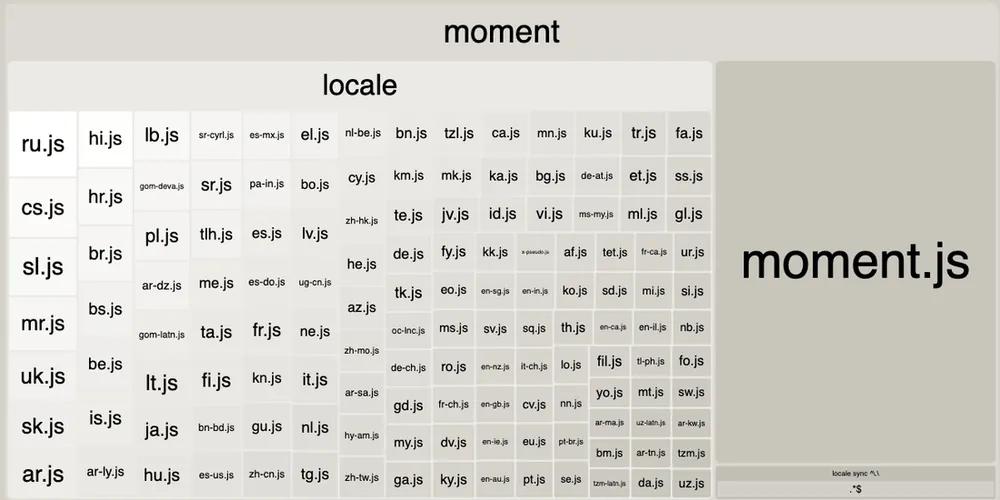
Looking at the visual of bundle.js, the locale data in the moment package already makes up 480KB. In the case that no locale functionality is used, we should remove that portion of the package from the bundle. Webpack’s ContextReplacementPlugin is the best way to do this.
 670KB total
import webpack from 'webpack'
// only include files matching `/(en)$/` in the `moment/locale` context
webpackConfig.plugins.push(
  new webpack.ContextReplacementPlugin(/moment[/\\]locale$/, /(en)$/)
)
A quick look at the bundle analyzer visualization shows that this simple plugin already shaves ~480KB off our bundle size. A very quick win.
 176KB total
moment-timezone-data-webpack-plugin
If you’re using moment-timezone in your app, you’ll find moment-timezone-data-webpack-plugin extremely useful. Moment-timezone includes a comprehensive json file of all timezones for a wide date range, which results in a package size of ~208KB. As with locales, it’s highly likely we don’t need this large data set, so let’s get rid of it. This plugin helps us do that by customizing the data we want to include and stripping out the rest.
Install:
yarn add -D moment-timezone-data-webpack-plugin
# or
npm install --save-dev moment-timezone-data-webpack-plugin
Usage:
import MomentTimezoneDataPlugin from 'moment-timezone-data-webpack-plugin'
// only include timezone data starting from year 1950 to 2100 in America
webpackConfig.plugins.push(
  new MomentTimezoneDataPlugin({
    startYear: 1950,
    endYear: 2100,
    matchZones: /^America\//,
  })
)
A before and after analysis shows the package size shrinking to 19KB from 208KB.
Code splitting
A major feature of Webpack is code splitting, which is partitioning your code into separate bundles to be loaded on demand or in parallel. There are a couple ways code splitting can be done through Webpack, one of which is having multiple entry points and another is having dynamic imports. We’ll be focusing on dynamic imports.
Polyfills
A fitting use case for code splitting is polyfills, since they're only neccessary depending on the browser. We don't know in advance whether a polyfill would be required until the client fetches the bundle, and thus we introduce dynamic imports.
In cases where a dependency is used for something that is already supported by some browsers, it may be a good idea to drop the dependency, use the native function supported by most browsers, and polyfill the function for browsers that don’t support it. One example is getting the timezone.
import moment from 'moment-timezone'
moment.tz.guess()
// works the same as
Intl.DateTimeFormat().resolvedOptions().timeZone
If we get Intl.DateTimeFormat().resolvedOptions().timeZone polyfilled on the older browsers, we can completely drop moment-timezone as a dependency, reducing our bundle size by an extra ~20KB.
Let’s start by adding the polyfill as a dependency.
yarn add date-time-format-timezone
# or
npm install date-time-format-timezone
We should only import it if the browser does not support it.
if (!Intl.DateTimeFormat().resolvedOptions().timeZone) {
  import(/* webpackChunkName: “polyfill-timezone” */ ‘date-time-format-timezone’).then((module) => module.default)
}
As Webpack traverses through the code during compilation, it’ll detect any dynamic imports and separate the code into its own chunk. We’ve accomplished two things: reducing the size of the main bundle, and only sending the polyfill chunk when necessary.
Frontend routes
For complex web apps that can be divided into sections, route-based code splitting is a clear solution. For example, a website may have an 'e-commerce' section and an 'about the company' section. Many users who visit the site only interact with the e-commerce pages, so loading the other sections of the web app is unnecessary. Let’s reduce our bundle size by splitting our main bundle into many bundles to be loaded on demand.
If you’re using React, good news because route-based code splitting is pretty intuitive in this framework. Like with the example shown earlier, dynamic imports is used to partition the app into separate bundles.
import React, { Suspense, lazy } from 'react'
import { BrowserRouter, Route, Switch } from 'react-router-dom'
import LoadingScreen from 'components/LoadingScreen'

const App = (props) => (
  <BrowserRouter>
    <Suspense fallback={<LoadingScreen />}>
      <Switch>
        <Route
          exact
          path="/"
          component={lazy(() => import('routes/landing'))}
        />
        <Route path="/shop" component={lazy(() => import('routes/shop'))} />
        <Route path="/about" component={lazy(() => import('routes/about'))} />
      </Switch>
    </Suspense>
  </BrowserRouter>
)
Once we have this code in place, Webpack will take care of the bundle-splitting.
Removing duplicate dependencies
Duplicate dependencies arise when dependencies with overlapping version ranges exist. This generally happens due to the deterministic nature of yarn add and npm install. As more dependencies are added, the more likely duplicate packages are installed. This leads to an unnecessarily bloated size of your web app and bundle.
Fortunately, there are tools for this. If you’re using yarn version 2 or greater, you can skip this as yarn has taken care of it automatically. These tools work by moving dependencies with overlapping version ranges further up the dependency tree, enabling them to be shared by multiple dependent packages, and removing any redundancies.
If you’re using yarn 1.x:
yarn global add yarn-deduplicate
yarn-deduplicate yarn.lock
Or if you use NPM:
npm dedupe
Upgrading and removing dependencies
Look at the bundle visual again and check if the large dependencies support tree shaking and whether there is a similar but smaller package that does everything you need. Upgrading dependencies frequently is recommended, as package size usually slims down over time and as tree shaking is introduced.
Lastly, production mode
Make sure Webpack is in production mode on release! Webpack applies a number of optimizations to your bundle, including minification with TerserWebpackPlugin if you’re using Webpack v4 or above. If not, you’ll have to install and add it manually. Other optimizations include omitting development-only code and using optimized assets.
Summary
We’ve covered the importance of bundle size, analyzing the composition of a bundle, tree shaking, code splitting, dependency deduplication, and various Webpack plugins to make our lives easier. We also looked into dynamic imports and loading code on demand. With these practices introduced into your webpack.config.js file, you can worry less about those dreaded loading spinners!
We’ve applied these practices to our code at Anvil, and believe sharing our experience helps everyone in creating awesome products. If you’re developing something cool with PDFs or paperwork automation, let us know at developers@useanvil.com. We’d love to hear from you.

